Docker is an open platform for developing, shipping, and running applications. Docker enables you to separate your applications from your infrastructure so you can deliver software quickly. With Docker, you can manage your infrastructure in the same ways you manage your applications. By taking advantage of Docker’s methodologies for shipping, testing, and deploying code quickly, you can significantly reduce the delay between writing code and running it in production.
Images and containers
A Docker image is a "template" used to run containers.
Let's pull our very first image :
Nginx.
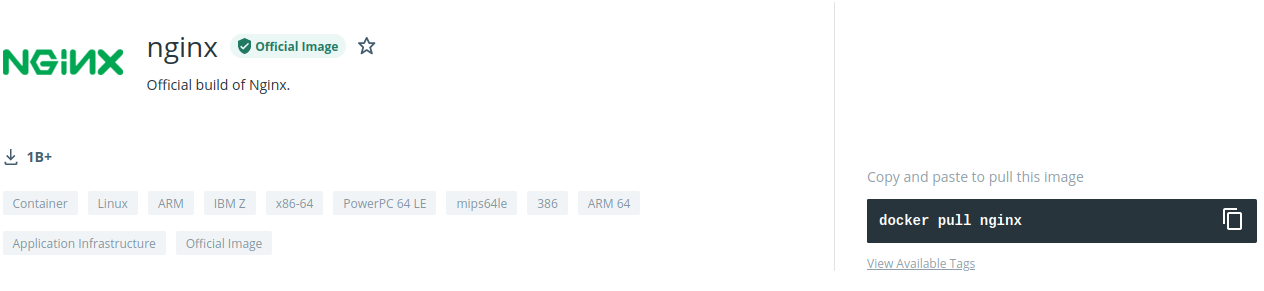
Docker hub Nginx.
To use Docker commands without problems, let's switch to root user account (we will use the root user in all next commands)
Root user account.
To pull an image from Docker hub we run the command:
Let's pull nginx image:
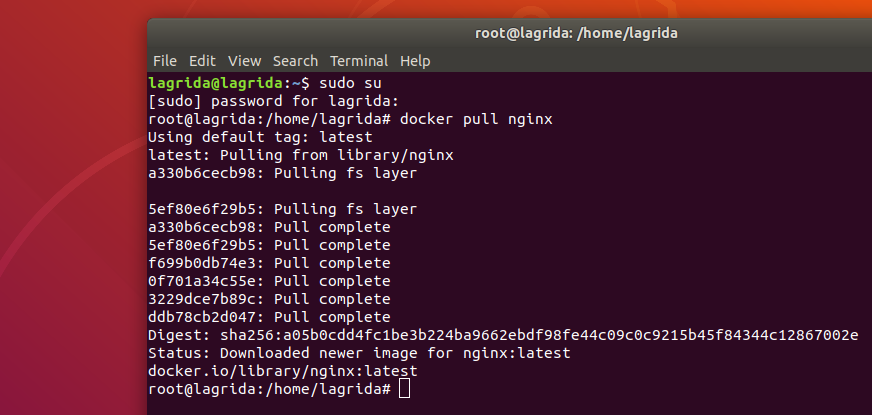
Pulling nginx image.
The command above will pull the
latest image in docker hub, otherwise we can specify the version that we need as explained in nginx docker hub page (
tags).
To show all images installed in our machine:
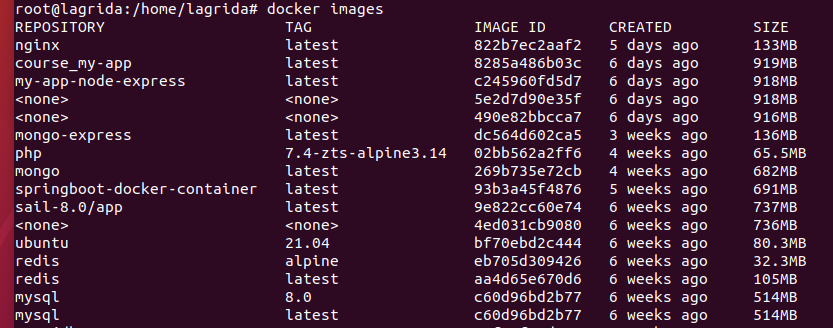
Installed images.
To run a container from an image we use the command:
docker run (image_name:tag | image_ID | image_first_ID)
And we specify the image name, the complete image ID, or just the first characters of the image ID (if there is no overlap with other image ID)
Notice: if we didn't specify the tag, then docker use
latest by default.
Let's run nginx image container
docker run -p 8081:80 nginx

Run an nginx container.
the flag -p 8081:80 mean that we map the port in the container (80) to our machine(8081), this will be explained well later.
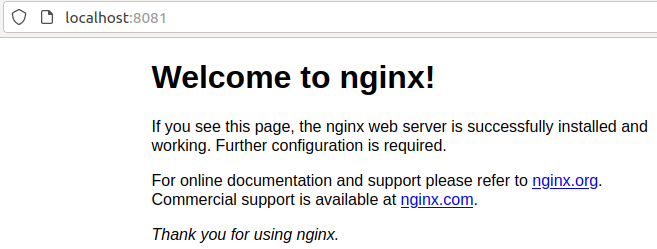
If we test with the url : http://localhost:8081 Nginx works fine!
An example of how.
We can run many containers with nginx image as we like (using the default bridge network).
To display all running containers, we use commands :
Or

Running containers.
Docker gives a random name to the container, we can give a custom name, to run a container with a given name we use --name flag :
docker run --name given_name (image_name:tag | ID | first_ID)
Example: lets run another container using nginx image, and with a given name:
docker run -p 8082:80 -d --name example_name nginx

Run a container with a name.
Let's see the running containers (docker ps)

Running containers.
We can handle the container with it's name, ID, or just the first characters of the container ID (if there is no overlap with other containers IDs)
Notice2: It's important to give a name to a container in order to handle it, rather than using it's ID.
To stop a running container we use the command:
docker stop (container_name | container_ID | first_container_ID)
Let's stop the last container we created with nginx image:
The container is stopped now, and not available when we run the command:
But we can found all containers (stopped + running) by using the flag -a :
And we can see the status of the containers

docker listing all containers.
We can start the container again by using the command:
docker start example_name
We can remove a stopped container (if the container is running we should stop it first or an error will be occurred)
docker rm (container_name | container_ID | first_container_ID)
Error in trying to remove a running container:

Error in trying to remove a running container.
We can force the Removal of a container (stopped or running) by using -f flag:
docker rm -f (container_name | container_ID | first_container_ID)
In this case Docker will stop the container first and remove it.
To display just the ID's of running containers we use the -q flag :
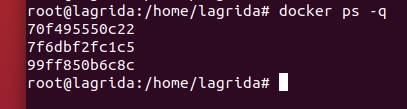
docker displaying running contaers ID's.
Then if we want to display all containers ID's (runing + stopped) :
This can help when we need to remove all running containers :
docker rm -f $(docker ps -q)
Or remove all containers :
docker rm -f $(docker ps -aq)
We see how to run + stop + delete containers from an image, and if we want to delete an image we use the command:
docker image rm (image_name:tag | image_ID | first_image_ID)
Or
docker rmi (image_name:tag | image_ID | first_image_ID)
To remove an image we should remove all containers use this image.
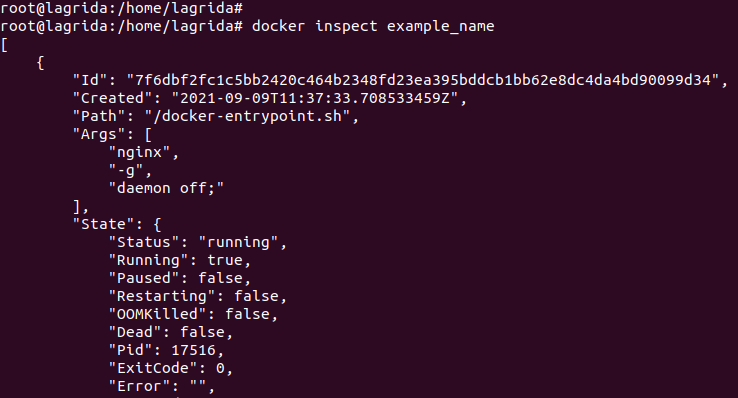
To inspect a docker container we use the command:
docker inspect (container_name | container_ID | first_container_ID)
This command gives all informations about the container.
Example: Let's inspect the last container we created with nginx image:
docker inspect example_name
docker inspect a container.
Let's inspect the internal Ip address (bridge network : 172.17.0.4/16):
docker inspect example_name | grep IPAddress

Docker inspect IP address of a container.
To inspect docker container logs we use the command:
docker logs (container_name | container_ID | first_container_ID)
We can follow the logs with attach mode using the -f flag :
docker logs (container_name | container_ID | first_container_ID) -f
We can format the output of ps command, example:
docker ps --format="ID\t:\t{{.ID}}\nNAME\t:\t{{.Names}}\nIMAGE\t:\t{{.Image}}\nPORTS\t:\t{{.Ports}}\nCOMMAND\t:\t{{.Command}}\nCREATED\t:\t{{.CreatedAt}}\nSTATUS\t:\t{{.Status}}\n"
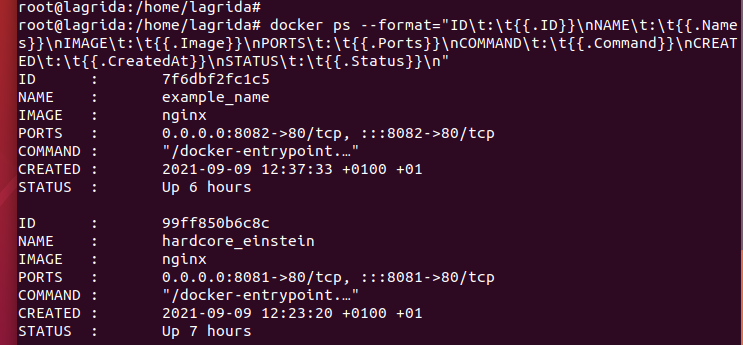
Example format flag.
Docker port mapping
To publish a port and then use the url http://localhost:(a_port) we use the command:
docker run -p (machine port):(docker container internal port) (image_name:tag | image_ID | first_image_ID)
Then we can deal with the container with the url: http://localhost:(a_port) and we see an example with nginx container above.
we can use multi port mapping, example
docker run -p 8090:8080 -p 8091:8080 (image_name:tag | image_ID | first_image_ID)
Example Nginx image :
Nginx run internally in port 80, then we can map the port:
docker run -d --name port_nginx -p 8090:80 -p 8091:80 nginx
Then we can use nether urls http://localhost:8090 or http://localhost:8091 to access to nginx in our machine.
Docker attached/detached mode
Run a container in detached mode means that the container run in background.
To run a container with detached mode we use the command:
docker run -d (image_name:tag | image_ID | first_image_ID)
we can attach the container again with the terminal by using the command:
docker attach (container_name | container_ID | first_container_ID)
Docker environment variables
Some docker images use some values passed as environment variables to the container, we can pass the environment variables using the -e flag:
docker run -e EXAMPLE_VAR_1=value1 -e EXAMPLE_VAR_2=value2 (image_name:tag | image_ID | first_image_ID)
If we have a lot of environment variables we can put them in a file and then call the file.
First let's create a file .env with some environment variables:
EXAMPLE_VAR_1=value1
EXAMPLE_VAR_2=value2
EXAMPLE_VAR_3=value3
EXAMPLE_VAR_4=value4
Then to call those environment variables we use --env-file flag :
docker run --env-file=./.env (image_name:tag | image_ID | first_image_ID)
Example: let's pull mongo image from docker hub :
Mongo
Pull mongo image.
To run a container with mongo image and with admin user
root and password
123456, we pass those values as environment variables as mentioned in
mongo page in docker hub.
docker run -d --name mongo_example -e MONGO_INITDB_ROOT_USERNAME=root -e MONGO_INITDB_ROOT_PASSWORD=123456 mongo
Docker exec/interactive mode
If the image provide a terminal then we should use -i flag to switch our terminal to this one:
docker run -i (image_name:tag | image_ID | first_image_ID)
Example: let's pull the image :
example-image.
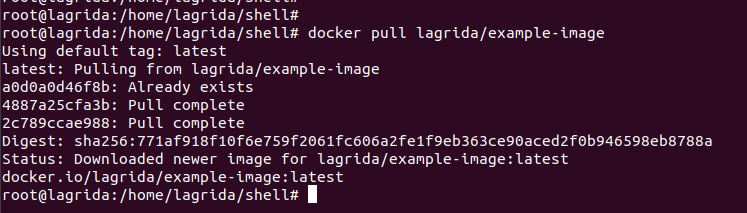
Pull lagrida example image.
If we run a container from this image it will execute this shell script :
#! /bin/sh

echo "--------------------------------------"
echo "SCRIPT 1 : WHAT IS YOUR AGE"
echo "--------------------------------------"
read -p "Enter your age : " age

echo "Your age is : $age"
Let's run the command:
docker run lagrida/example-image
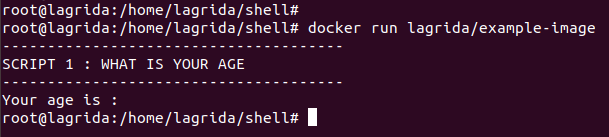
Run lagrida example image.
As we can see, when we run the command we return directly to our terminal.
To enter to the container terminal we should use -i flag:
docker run -i lagrida/example-image
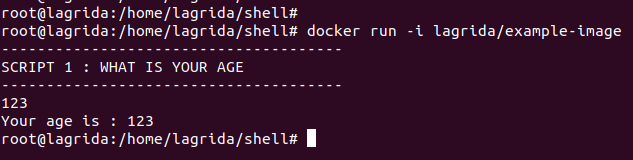
Run lagrida example image.
But still one problem, we can't see the terminal messages, then we should use -t flag :
docker run -it lagrida/example-image
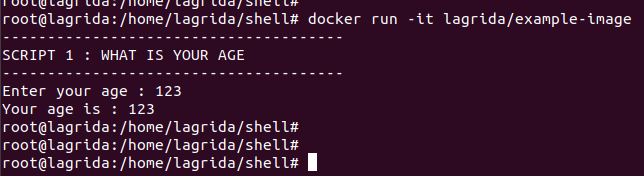
Run lagrida example image.
Let's run a mongo container:
docker run --name mongo_example -e MONGO_INITDB_ROOT_USERNAME=root -e MONGO_INITDB_ROOT_PASSWORD=123456 -d mongo
If we install mongo in our machine (Linux), we can connect to mongo with shell using the command:
Let's execute this command inside our mongo container, to do so we use the command exec :
docker exec -it mongo_example mongo -u root -p

Connecting to mongo shell.

Mongo shell.
Now we can execute mongo commands inside our container
mongo_example.
Docker volumes
After stopping or removing a container, all data and changes inside this container will be lost if we don't bind data in the container with our machine.
Docker volumes allow us to store data in our machine in order to use it when we run the container again, and in this case we persist data.
There 3 types to use volumes in docker :
Host Volume (Bind mount), Anonymous volumes, named volumes.
Host Volume (Bind mount) is used when we specify a path in our machine to bind data with the container.
Anonymous volumes and
named volumes are managed by docker as we will see.
Let's work with mongo image.
From
mongo page in Docker hub, dbs and collections data are stored in the path /data/db in the container.
1) Host Volume (Bind mount): Host Volume (Bind mount) is used when we specify a path in our machine to bind data with the container.
Let's create the folder in our machine /var/data/mongodb :
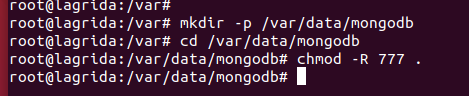
Creating the folder /var/data/mongodb.
To map volumes (Bind mount) we use -v flag and we specify the path in our machine in front of container's path:
docker run -d --name mongo_example -v /var/data/mongodb:/data/db -e MONGO_INITDB_ROOT_USERNAME=root -e MONGO_INITDB_ROOT_PASSWORD=123456 mongo
And let's connect again to mongo shell :
docker exec -it mongo_example mongo -u root -p
Let's try to create a db & a collection & insert some values:
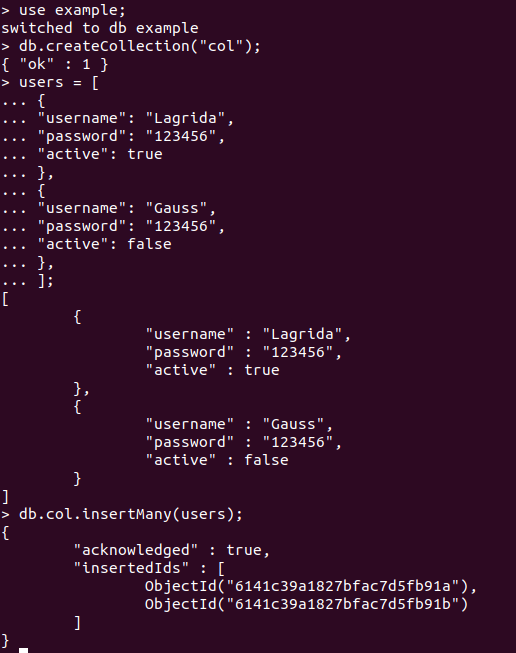
Mongo shell create db, collection.
Let's exit from mongo console and remove the container:

Remove mongo container.
Let's run the container again and re-enter to mongo console and see if the data persist :
docker run -d --name mongo_example -v /var/data/mongodb:/data/db -e MONGO_INITDB_ROOT_USERNAME=root -e MONGO_INITDB_ROOT_PASSWORD=123456 mongo
docker exec -it mongo_example mongo -u root -p
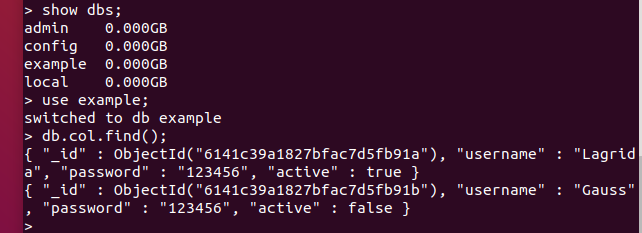
Data persist.
Then the data persist as we see.
If we enter to the folder /var/data/mongodb :

Mongodb data files.
An other way to run the command above:
docker run -d --name mongo_example --mount type=bind, source=/var/data/mongodb, target=/data/db -e MONGO_INITDB_ROOT_USERNAME=root -e MONGO_INITDB_ROOT_PASSWORD=123456 mongo
Anonymous volumes are managed by docker, and docker store data in a random path : /var/lib/docker/volumes/random_hash/_data
Example, let's run the command:
docker run -d -v /data/db mongo
To display volumes (Anonymous and named) let's run the command:
We can see that anonymous volumes name's are a random hash.

Docker volumes.
Named volumes are managed by docker, we can create named volume in order to use it easily with it's name.
Let's create a volume:
docker volume create mongo_volume

Docker volumes.
In this case Docker will manage the place when the data will be stored:
docker run -v mongo_volume:/data/db mongo
To delete all volumes (anonymous + named) we can run the command:
Notice that this command will remove all volumes except for those related to a running containers.
Docker networks
Docker provide 3 types of network: Bridge, Host, None.
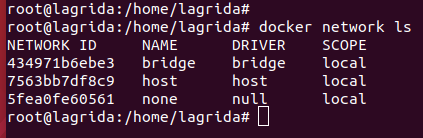
Docker Network list.
It is a private default network created on the host.
Containers linked to this network have an internal IP address through which they communicate with each other easily.
The Docker server (daemon) creates virtual Ethernet bridge called docker0 that performs the operation by automatically delivering packets among various network interfaces
These are widely used when applications are executed in a standalone container.
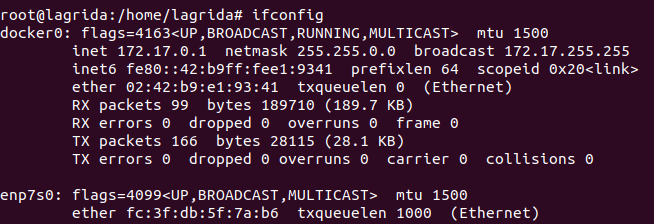
Machine Networks.
Bridge is the default network if we don't specify one using --network flag when we run a container.
We can create our own network, and in this network containers can communicate with each other using there names, and that is possible because Docker create an internal DNS in this network.
Let's run 2 containers from nginx and mongo :
docker run -d --name nginx_example nginx
docker run -d --name mongo_example mongo
Let's inspect Bridge network:
docker network inspect bridge
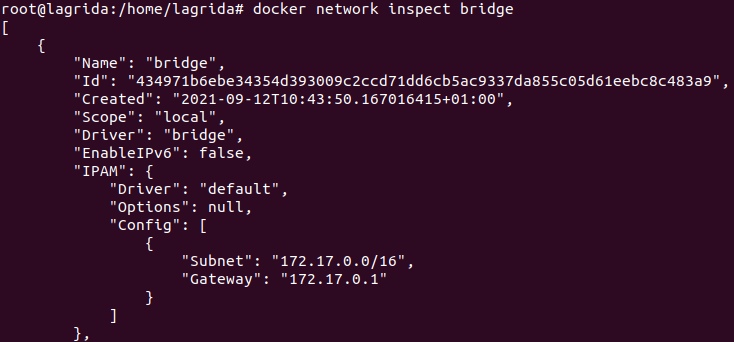
Inspect bridge network.
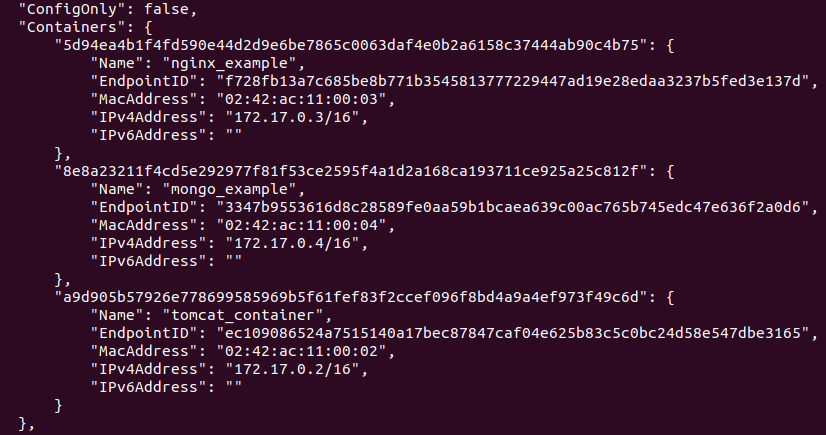
Inspect bridge network.
We can see containers with network bridge in the output.
But those containers are not able to communicate with each other using there names, to test that let's run command:
docker run -d --name nginx_example nginx
Let's run the command:
docker exec -it nginx_example bash
First let's check if 'ping' command is available:
If the command is not working, we should add it by running:
apt-get update
apt-get install iputils-ping
Then let's try the command:

Ping fail.
Let's remove the containers:
docker rm -f nginx_example mongo_example
Let's create a network of type bridge named
my-bridge-network:
docker network create -d bridge my-bridge-network
Then let's create our containers using the network
my-bridge-network:
docker run -d --name mongo_example --network=my-bridge-network mongo
docker run -d --name nginx_example --network=my-bridge-network nginx
Now let's execute the command:
docker exec -it nginx_example bash
If the command ping is not working, we should add it by running:
apt-get update
apt-get install iputils-ping
Then let's try the command:
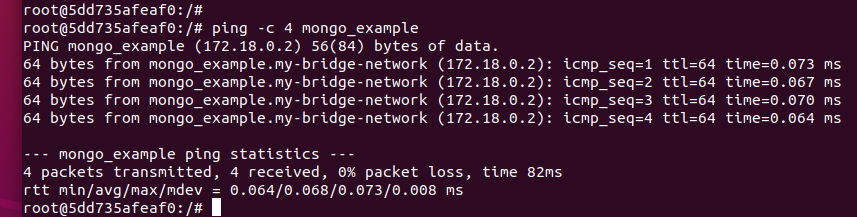
Ping success.
Then if we want to link more than container we put theme in one network.
2) host : It is a public network
It utilizes the host's IP address and TCP port space in order to display the services running inside the container.
It effectively disables network isolation between the docker host and the docker containers which means using this network driver a user will be unable to run multiple containers on the same host.
Example: Let's run a Ngnx container:
docker run -d --name nginx_example nginx --network=host
You can see that nginx works fine in the url :
http://localhost/.
3)none : In this network driver, the docker containers will neither have any access to external networks nor will it be able to communicate with other containers.
This option is used when a user wants to disable the networking access to a container.
In simple terms, none is called a loopback interface which means it has no external network interfaces.
Alpine Linux is a very small Linux distribution.
As we explained above, images are built from Linux distributions (ubuntu, Centos, Debian, alpine, ...)
Let's Check from which linux distribution ngnix image it built.
First let's run a nginx container:
docker run -d --name nginx_example nginx
Then let's run the command :
docker exec -it nginx_example bash
Then let's show which linux distribution :
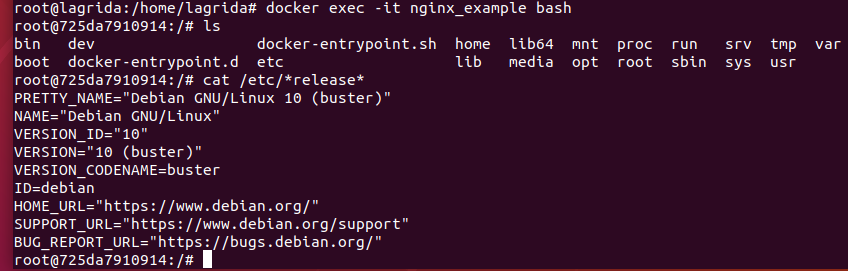
Nginx image linux distribution.
As we can see, nginx image is built from linux Debian distribution.
Let's pull node image (alpine and normal):
Node docker imagesAnd the alpine image:
Let's display all images:
We can see the difference in size between the two images:
The alpine image has 133Mb but the normal image has 907Mb.
Let's run a container from node:
docker run -d --name node_example node sleep 3600
Then execute the commands in image:
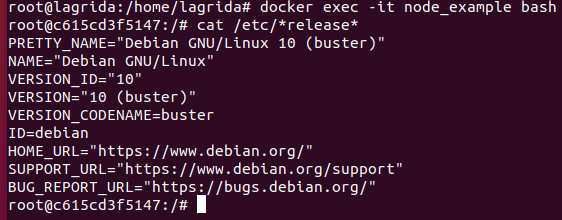
Node image linux distribution.
Let's run a container from node:alpine
docker run -d --name node_example_2 node:alpine sleep 3600
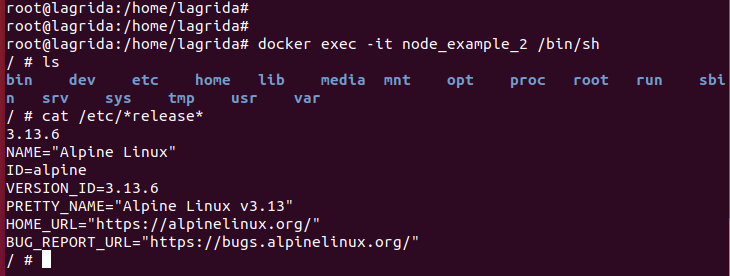
Node alpine image linux distribution.
As a conclusion, we should always pull alpine versions!
What we do up to now is working with existing images, in this section we will try to create our own images.
Docker documentation for building images :
The documentation.
Example: Let's build an image with nodejs, expressJs, nodemon.
Let's create a directory (example : /home/lagrida/node/example)
First let's init a project with:
Let's open the project with visual code in this directory (/home/lagrida/node/example):
Let's install dependencies express and nodemon :
npm install express && sudo npm install -g --force nodemon && npm install --save-dev nodemon
Let's create index.js page :
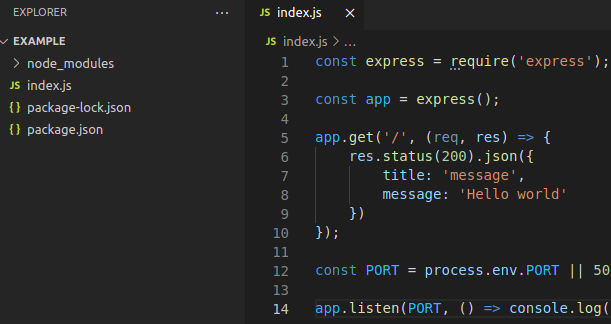
Index page.
index.js source code:
const express = require('express');
const app = express();
app.get('/', (req, res) => {
    res.status(200).json({
        title: 'message',
        message: 'Hello world'
    })
});
const PORT = process.env.PORT || 5000;
app.listen(PORT, () => console.log(`App start at port : ${PORT} ...`));
To build a docker image, we should construct a file (by default named Dockerfile but we can give any name we want) and specify the instructions (steps) to build our image.
Let's construct the Dockerfile in our project directory:
FROM node:alpine
WORKDIR /app
COPY package.json .
RUN npm install
EXPOSE 5000

COPY . ./
CMD ["node", "index.js"]
Let's explain the constructions one by one :
FROM node:alpine :
This instruction mean that we will use the image node:alpine.
WORKDIR /app :
This instruction create the directory /app in our image (if not exist) and enter to it.
COPY package.json . :
This instruction will copy the package.json file from our machine to the current directory of the image (/app).
We will know why we copy this file in this order later.RUN npm install :
This instruction will run the command npm install
in our image.
COPY . ./ :
This instruction will copy the project in our machine to the current directory in the image (/app).
CMD ["node", "index.js"] :
This instruction will run the command node index.js in the image.
The order of the instructions (steps) is very important in Dockerfile (for optimization purposes).
In first build Docker will construct all steps, after that Docker will check the cache, and if something is changed in an instruction, Docker will rebuild all instructions come after this one.
Then we put the instruction "
COPY package.json ." before the instruction "
RUN npm install" to rebuild it only if we add new dependencies (and then changing the file package.json).
And you can see that we put the command
COPY . ./ at the end of our file, just before the execution command.
And finally let's build the image :
docker build -t my-app-node-express .
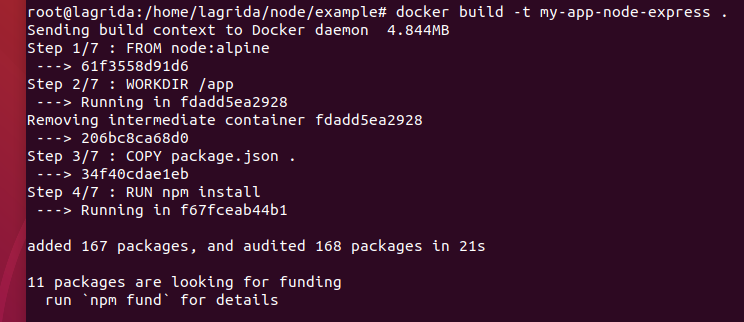
Build our first image.
Let's test the image :
docker run -d --name my-app -p 5000:5000 my-app-node-express
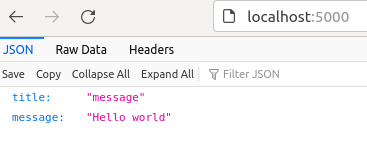
The container work fine.
If we try to change code, it will not be changed in the container until we rebuild the image!
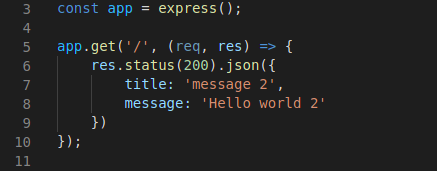
Changing index.js code.
Let's rebuild the image :
docker build -t my-app-node-express .
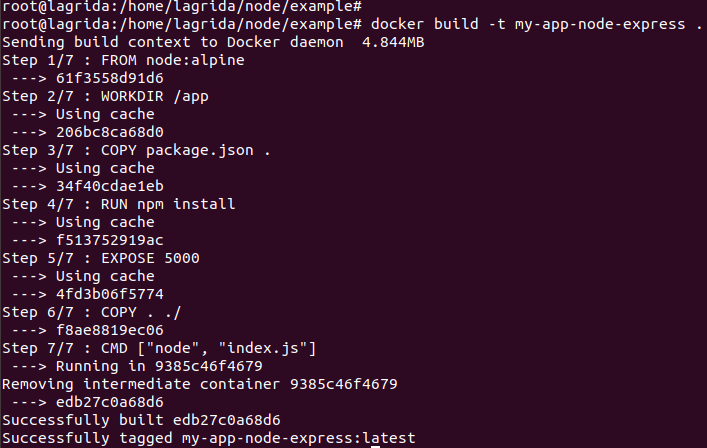
Rebuild the image.
You can see that Docker use caches in steps that are not changed.
And the strategy of putting the instruction "COPY . ./" at the end of Dockerfile benefit us an unnecessarily rebuild of many steps.
Let's display our images by running the command:

Docker images.
We can see an image with name <none> and tag <none>, This is the first image we build, and in docker it can't be 2 images with the same name and tag.
After Rebuild and running again the container :
docker run -d --name my-app -p 5000:5000 my-app-node-express
We can see that changes are made.
But it's useless to rebuild an image every time we want to change our code, and also we should fix several issues while creating our images!
Dockerignore file :Let's run a container from our image again:
docker run -d --name my-app -p 5000:5000 my-app-node-express
Let's execute:
docker exec -it my-app /bin/sh

Inside our container.
We can see that Dockerfile is also copied, and that not appreciated, we want only project files to be copied.
Also node_module from our directory override the node_modules in the image when we run the command '
COPY . ./'.
We should prevent those files to be copied from our machine to the image workdir !
Let's construct the file .dockerignore in our project:
This file is similar to file .gitignore if we use git.
And let's put there all files and folders that we don't want to be copied in the image:
node_modules
.git*
Dockerfile
Let's rebuild again our image.
If we inspect our image now we can see that there is no Dockerfile file in the /app path.
Let's work now to map volumes in order to make changes happened in our container.
First let's install nodemon globaly in our image:
FROM node:alpine
WORKDIR /app
RUN npm install -g nodemon
COPY package.json .
RUN npm install
EXPOSE 5000

COPY . ./
CMD ["nodemon", "index.js"]
Then let's map the volume to our volume:
docker run -d --name my-app -v $(pwd):/app -p 5000:5000 my-app-node-express
Notice that we should run this command in our project path, because $(pwd) give the current path, otherwise you can specify the absolute path of the project, in my case i have the project in the path /home/lagrida/node/example:
docker run -d --name my-app -v /home/lagrida/node/example:/app -p 5000:5000 my-app-node-express
Now we can see that changes are made !
Environment variablesLet's change the port with a variable environment :
FROM node
WORKDIR /app
ENV PORT 3500
RUN npm install -g nodemon
COPY package.json .
RUN npm install
EXPOSE $PORT

COPY . ./
CMD ["nodemon", "index.js"]
Let's rebuild the image :
docker run -d --name my-app -v $(pwd):/app -e PORT=4000 -p 5000:4000 my-app-node-express
If we have a lot of envirement variable we can put them in a file :
Let's create .env file in our project (or we can create it in any other place):
Then run the command :
docker run -d --name my-app -v $(pwd):/app --env-file=./.env -p 5000:4000 my-app-node-express
Docker Compose is a tool for defining and running multi-container Docker applications.
We put the configurations in a YAML file (by default named docker-compose.yml but we can give any name we want).
First, let's create a project with nodeJs and Mongodb with only what we learn above, then we will use Docker-compose to see how it simplify the way to run containers.
Let's create a directory for our project (example : /home/lagrida/node/example2)
Let's init the project:
Let's open the project with visual code in this directory (/home/lagrida/node/example2):
Let's install dependencies : express and nodemon and mongoose :
npm install express
sudo npm install -g --force nodemon
npm install --save-dev nodemon
npm install mongoose
Let's create the Dockerfile (to build the image) :
FROM node:alpine
WORKDIR /app
RUN npm install -g nodemon
COPY package.json .
RUN npm install
EXPOSE 5000

COPY . ./
CMD ["nodemon", "index.js"]
Let's create the .dockerignore file :
node_modules
.git*
Dockerfile
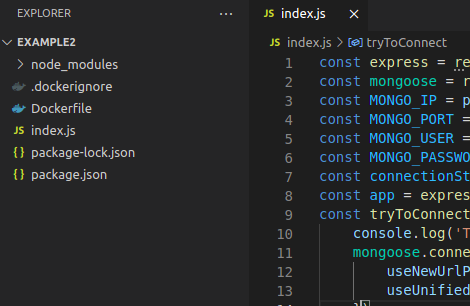
Let's create the index.js file, it's a simple application, we only test if we can connect to mongo database:
const express = require('express');
const mongoose = require('mongoose');
const MONGO_IP = process.env.MONGO_IP || "mongodb";
const MONGO_PORT = process.env.MONGO_PORT || 27017;
const MONGO_USER = process.env.MONGO_USER;
const MONGO_PASSWORD = process.env.MONGO_PASSWORD;
const connectionStr = `mongodb://${MONGO_USER}:${MONGO_PASSWORD}@${MONGO_IP}:${MONGO_PORT}/myapp?authSource=admin`;
const app = express();
const tryToConnect = () => {
    console.log('Trying To Connect....');
    mongoose.connect(connectionStr, {
        useNewUrlParser: true,
        useUnifiedTopology: true
    })
    .then(() => console.log('Mongo connection success'))
    .catch(error => {
        console.log('Mongo connection error...');
        setTimeout(tryToConnect, 10000);
    });
}
tryToConnect();
const PORT = process.env.PORT || 5000;
app.listen(PORT, () => console.log(`App start at port ${PORT} ...`));
In our application we will pass connection values
MONGO_IP, MONGO_PORT, MONGO_USER, MONGO_PASSWORD as environement variables.
The function
tryToConnect will try to connect to mongoDB, if the connection fails tryToConnect function runs again in 10 seconds.
Express, mongo project.
Let's build our image:
Now Let's run containers :
Let's create a named volume :
docker volume create my-app-volume
Let's run a mongo container:
docker run -d --name mongo_db -v my-app-volume:/data/db -e MONGO_INITDB_ROOT_USERNAME=root -e MONGO_INITDB_ROOT_PASSWORD=123456 mongo
Let's run the command :
docker inspect mongo_db | grep IPAddress

Container internal IP address.
The internal IP address for mongo_db container in my machine is
172.17.0.3, you may found an other value !
Let's now run our node image :
docker run -d --name app_container -p 5000:5000 -e MONGO_IP=mongo_db -e MONGO_USER=root -e MONGO_PASSWORD=123456 my-app
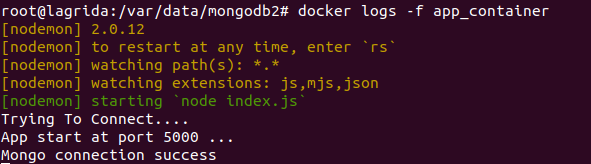
Let's check app_container container logs:
docker logs -f app_container

Connection failed with mongo db.
And the reason why the connection is failed is that
app_container can't recognize
mongo_db by it's name.
Let's try with it's internal IP :
172.17.0.3 (make sure that you found your correct Internal IP address of mongo_db container as mentioned above)
First let's remove app_container container :
docker rm -f app_container
And let's run the command:
docker run -d --name app_container -p 5000:5000 -e MONGO_IP=172.17.0.3 -e MONGO_USER=root -e MONGO_PASSWORD=123456 my-app
Let's check app_container container logs:
docker logs -f app_container
Connection success with mongo db.
Connection is established with mongodb, but it's not practical to use the internal IP, because it's change in every time after running and stopping containers.
As explained in Docker networks section, we will create a network, and group our images together.
Let's create a network of type Bridge:
docker network create -d bridge my-app-network
Let's remove the running containers:
docker rm -f app_container mongo_db
Then let's run mongo container again with the command:
docker run -d --name mongo_db -v my-app-volume:/data/db -e MONGO_INITDB_ROOT_USERNAME=root -e MONGO_INITDB_ROOT_PASSWORD=123456 --network my-app-network mongo
And Let's run our node app:
docker run -d --name app_container -p 5000:5000 -e MONGO_IP=mongo_db -e MONGO_USER=root -e MONGO_PASSWORD=123456 --network my-app-network my-app
Let's check app_container container logs:
docker logs -f app_container
Connection success with mongo db.
Let's create a file with name : docker-compose.yml
Docker compose file.
In this file we will tell docker how to run our containers:
Let's start with mongodb, in the previous example we used the command :
docker run -d --name mongo_db -v my-app-volume:/data/db -e MONGO_INITDB_ROOT_USERNAME=root -e MONGO_INITDB_ROOT_PASSWORD=123456 --network my-app-network mongo
For more informations about docker-compose versions see the
documentation.
We will use version 3:
version: "3"
services:
  mongo_db:
    image: mongo
    volumes:
      - my-app-volume:/data/db
    environment:
      - MONGO_INITDB_ROOT_USERNAME=root
      - MONGO_INITDB_ROOT_PASSWORD=123456
volumes:
  my-app-volume:
And for our node app, we used this command to run a container:
docker run -d --name app_container -p 5000:5000 -e MONGO_IP=mongo_db -e MONGO_USER=root -e MONGO_PASSWORD=123456 --network my-app-network my-app
Let's add that to our docker-compose file :
version: "3"
services:
  mongo_db:
    image: mongo
    volumes:
      - my-app-volume:/data/db
    environment:
      - MONGO_INITDB_ROOT_USERNAME=root
      - MONGO_INITDB_ROOT_PASSWORD=123456
  app_container:
    build: .
    image: my-app
    ports:
      - 5001:5000
    environment:
      - MONGO_IP=mongo_db
      - MONGO_USER=root
      - MONGO_PASSWORD=123456
    depends_on:
      - mongo_db
volumes:
  my-app-volume:
There is no need to create a network, because docker will create one by default.
Let's run the command (in our project directory) :

Docker compose up.
Let's display running containers:

Docker display running containers.
Let's inspect my_app container logs :
docker logs -f example2_app_container_1
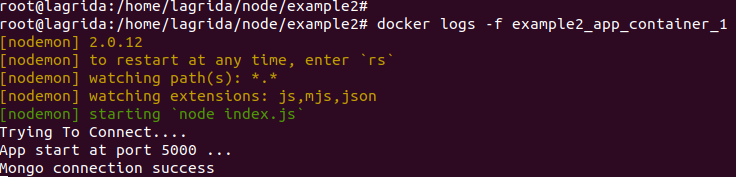
Docker inspect my-app logs.